KUT7248.LT Puitmaterjalide tehnoloogiad ja õpetamise metoodika 2024
From wikiluntti
Introduction
1
Homeworks
Guides for presentation
Short time (5-7) min: provide a quick and memorable "business card" for a specific subject (tree species).
About 6 slides.
- Title slide (approx. 15 seconds)
- Name of tree species (in Estonian and Latin), author's name.
- The presenter briefly introduces themselves and the topic.
- Introduction: "Hook" (approx. 45 seconds)
- Start right away with the most exciting fact: Example: "Today I'm going to talk about the common oak, a tree whose wood has been used to build Viking ships and make the most expensive wine barrels."
- Grab your audience's attention right away.
- Visual identification (approx. 1.5 minutes)
- Focus on 2-3 of the most characteristic features that can be used to identify trees in nature. Use large, high-quality images. Show the leaf/needle, bark, and fruit.
- Avoid detailed botanical descriptions. Say, for example: "The oak is most easily recognized by its distinctive feathery leaves and, of course, its acorns."
- Distribution and importance in Estonia (approx. 1 minute)
- Show the distribution map.
- mention where it mainly grows in Estonia and whether it is common or rare. Eg. "Oak trees are mainly found in western and central Estonia and on Saaremaa, preferring fertile soil."
- The value of wood and its main uses (approx. 1.5 minutes)
- This is the main part of the content. Select some of the most important or interesting uses of wood in Estonian traditional woodworking.
- Do not list all possible uses. Instead, explain why this wood is suitable for this particular purpose. Example: "Oak wood is exceptionally strong, durable, and has a beautiful texture, which is why it is a highly valued material in the production of quality furniture and parquet flooring. Its density and resistance to moisture also make it an ideal material for outdoor use."
- Summary and memorable closing statement (approx. 30 seconds)
- Repeat 2-3 main points. Example: "So, the common oak is the king of our forests, recognizable by its leaves, and its valuable wood is used to make the most durable objects."
- Sources used (slide remains on screen during questions)
Key recommendations
- Focus is key: Select only the most important information from each topic. Ask yourself: "What is the one thing I want my audience to remember about this topic?"
- Visuals speak louder than text: One good picture or graphic can replace several sentences. Keep text on slides to a minimum.
- Practice and timing: Timing is critical for a short presentation. Be sure to practice several times and take your time to stay within the given time frame.
- Leave out the details: There is no time to talk in detail about flowering, pests, etc., unless that is the main focus of the presentation. Focus on recognition and practical value.
Videos
- Content and relevance
- Justified need: The use of video must be justified in terms of content. It must offer unique added value that cannot be conveyed through images or text.
- Good examples: Time-lapse footage of a tree growing, video of wood being processed using a specific technique, drone footage of a forest, clip of an animal/bird closely associated with that tree species.
- Bad example: A random slideshow of tree pictures with music that does not provide any new information.
- Direct connection to the topic: The video clip must be directly and clearly related to a specific part of the presentation. The student must be able to explain why this particular clip is necessary
- Justified need: The use of video must be justified in terms of content. It must offer unique added value that cannot be conveyed through images or text.
- Length and time usage
- Maximum length: The maximum length of a video clip is 30–60 seconds.
- For shorter presentations (5–7 min), the limit should be up to 30 seconds. For longer presentations (10-12 min), up to 60 seconds may be allowed.
- Part of the total time: The time spent showing the video clip is part of the total time limit for the presentation. This means that the student must shorten their speech accordingly. This is the most important rule when planning your time.
- Maximum length: The maximum length of a video clip is 30–60 seconds.
- Integration into the presentation
- Introduction and conclusion: The video should not just "happen." The presenter should:
- Briefly explain what viewers will see and what they should pay attention to before showing the video. (e.g., "In the following 30-second clip, you will see how ash wood is bent using steam, which is one of the unique properties of this wood.")
- After the video ends, give a brief summary or comment on what was seen, linking it back to the main message of your presentation.
- The presenter remains the leader: The presenter must not let the video do the presentation for them. The video is a tool, not a substitute.
- Introduction and conclusion: The video should not just "happen." The presenter should:
- Technical quality and preparation
- Good quality: Video and audio quality must be good. Blurry, low-resolution, or poor-quality audio clips appear unprofessional and distracting.
- Embedding, not linking: The video must be embedded directly into the presentation file (e.g., PowerPoint or Google Slides). This avoids problems with internet connection interruptions or slowdowns during the presentation. Linking to external websites (e.g., YouTube) should be avoided.
- Backup plan (Plan B): Technology can fail. Students should have a backup plan in case the video does not play for some reason. They should be prepared to:
- Use a screenshot from the video and explain verbally what the video would have shown. Skipping that part and moving smoothly on to the next topic.
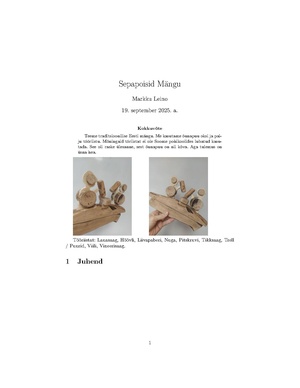
Sepapoisid
-

Drawings. Note the svg file also.

Materials
- Puitliist mõõtudega 600 x 30 x 10 mm
- Puitklots mõõtudega 65 x 35 x 20 mm
- Ristvineer mõõtudega 120 x 120 x 6 mm
- Liistunaelad 1,4 x 25 mm 2tk
- Puidukruvid 2,5 x 16 4tk