CNC-3018Pro cheap CNC milling machine: Difference between revisions
(→Cuts) |
|||
| (39 intermediate revisions by the same user not shown) | |||
| Line 1: | Line 1: | ||
== Introduction == | == Introduction == | ||
<gallery> | |||
Cnc plastic.jpg| Engraving on plastic | |||
Cnc plastic comparision dremelbit.png| Plastic with cylindrical diamond bit. Feed 50 (Spindle speed 1000 too much: melts, 250 about minimum; still melts, 100 too low; does not cut). Feed 20 (Spindle 250: melts back to the engraving; melts a little to the bit). Feed 30: same problem. Need to get a better bit with flutes to drive the plastic away. | |||
Cnc leka bits.jpg| Plywood | |||
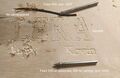
Cnc leka failed.jpg| The cylidrical bit weared out and dug itself into the plywood | |||
</gallery> | |||
Aim to do graving and milling PCB boards. | Aim to do graving and milling PCB boards. | ||
Maximum size of the material: 300 x 180 x 50 mm<sup>3</sup>. | Maximum size of the material: 300 x 180 x 50 mm<sup>3</sup>. | ||
Workflow | |||
# Design the cut | |||
# Use Inkscape's GCodeTool to generate the path | |||
# Use Candle (1.2.13b works) to | |||
## Simulate | |||
## Test run above the material | |||
## Do the milling | |||
Speed and materials | |||
# Plastic: Slow speed. 400 / 3400 too much: Burns. | |||
'''Acrylic''' (plexigalas, Lucitem PMMA). Other plastics incluce ABS, Delrin, HDPE. . . | |||
* Do not cut deep (melts). Set the to about .004 depth (which units). | |||
* Use ACR or FLX bits (they are the same). | |||
* Use a low spindle speed for best results. (Burnishing uses a very high spindle speed.) | |||
{| class="wikitable" | |||
|+ Caption text | |||
|- | |||
! Material (bit) !! Feed speed!! Spindle rpm !! Depth | |||
|- | |||
| Plastic/ Acrylic|| || Low (plastic melts) | |||
|- | |||
| Wood || Example || High (less burning) | |||
|- | |||
| Metal || Example || High | |||
|- | |||
| Al/ Cu/ || Example || Often high. Lubricant | |||
|} | |||
== Cutters == | == Cutters == | ||
| Line 43: | Line 84: | ||
* https://jscut.org/jscut.html# | * https://jscut.org/jscut.html# | ||
** Works only with closed paths; thus use Stroke to path to generate closed loop. | |||
* Inkscape Gcodetools | |||
** The default origin is the lower left corner of the image. Set the origin (orientation points) into a suitable place | |||
** Check the origin at the Candle! | |||
** Hershey fonts can be generated easily using Extensions -> Text -> Hershey | |||
* Inkscape GCodePlot | |||
* CadToCNC | |||
* Online | |||
** GCode creator https://sameer.github.io/svg2gcode/ and github at https://github.com/sameer/svg2gcode | |||
** Gcode viewer https://ncviewer.com/ | |||
* Python | |||
** svg-to-gcode 1.5.4 | |||
* Carbide Create | |||
=== Svg to STL and to GCode === | |||
* https://svg2stl.com/ | |||
* https://anyconv.com/svg-to-stl-converter/ | |||
== GCode short tutorial == | |||
[[File:Cnc testi.svg|thumb|Simple svg file with two closed paths]] | |||
=== Some commands === | |||
* <code>G21</code> Metric system | |||
* <code>G90</code> Absolute mode. All movements are relative to a fixed zero or machine home location. | |||
* <code>G1</code> Linear interpolation. Move in a straight line to a specific location. The speed is the feed rate (F). | |||
* <code>G3</code> Circle: The target coordinates at the end of the movement. I, J – The arc’s center point coordinates relative to the starting coordinates. | |||
* <code>M2</code> End of code. | |||
* <code>M3</code> Spindle on clockwise. | |||
* <code>M4</code> Spindle on counterclockwise. | |||
=== Generated by JsCUT === | |||
Problem; No open paths. Could be fixed by manipulating the gcode afterwards. | |||
<syntaxhighlight lang="gcode"> | |||
G21 ; Set units to mm | |||
G90 ; Absolute positioning | |||
G1 Z2.54 F2540 ; Move to clearance level | |||
; Operation: 0 | |||
; Name: | |||
; Type: Inside | |||
; Path 0 | |||
; Rapid to initial position | |||
G1 X40.8960 Y-24.8468 F2540 | |||
G1 Z0.0000 | |||
; plunge | |||
G1 Z-3.1750 F127 | |||
; cut | |||
G1 X40.8051 Y-24.9034 F1016 | |||
G1 X40.6768 Y-24.9809 | |||
. . . | |||
G1 X40.8960 Y-24.8468 | |||
; Retract | |||
G1 Z2.5400 F2540 | |||
; | |||
; Operation: 1 | |||
; Cut Depth: 3.175 | |||
; Rapid to initial position | |||
G1 X16.9248 Y-11.6624 F2540 | |||
G1 Z0.0000 | |||
; plunge | |||
G1 Z-3.1750 F127 | |||
; cut | |||
G1 X16.9581 Y-11.6253 F1016 | |||
. . . | |||
G1 X16.9248 Y-11.6624 | |||
; Retract | |||
G1 Z2.5400 F2540 | |||
M2 | |||
</syntaxhighlight> | |||
=== Generated by svg2gcode === | |||
No z movement. No end mark. However, "users can now specify a G-Code sequence to run at the beginning/end of a program and when the tool is turned on/off." | |||
<syntaxhighlight lang="gcode"> | |||
G21 | |||
G90;svg#svg1 > g#layer1 > path#path1 | |||
G0 X0.04645099999999763 Y0.13227800000000317 | |||
G1 X0.11730768492817545 Y0.1655076085116844 F300 | |||
. . . | |||
G1 X0.0464510000000161 Y0.13227800000000342 F300;svg#svg1 > g#layer1 > path#path2 | |||
G0 X15.828818999999998 Y16.684519000000005 | |||
G1 X15.958402417724608 Y16.436593348144537 F300 | |||
. . . | |||
G1 X15.828818999999998 Y16.684519000000005 F300 | |||
</syntaxhighlight> | |||
=== Generated by Inkscape === | |||
The first test is short and simple. Does all the things I want. | |||
<syntaxhighlight lang="gcode"> | |||
M3 | |||
(Header end.) | |||
G21 (All units in mm) | |||
(Start cutting path id: path2) | |||
(Change tool to Default tool) | |||
G00 Z5.000000 | |||
G00 X15.828841 Y16.684450 | |||
G01 Z-0.125000 F100.0(Penetrate) | |||
G03 X18.692664 Y11.495468 Z-0.125000 I96.722379 J49.996752 F400.000000 | |||
G03 X21.465422 Y7.194707 Z-0.125000 I53.645546 J31.541811 | |||
. . . | |||
G03 X15.828841 Y16.684450 Z-0.125000 I1.837010 J-3.751889 | |||
G01 X15.828841 Y16.684450 Z-0.125000 | |||
G00 Z5.000000 | |||
(End cutting path id: path2) | |||
(Start cutting path id: path1) | |||
(Change tool to Default tool) | |||
G00 Z5.000000 | |||
G00 X0.046473 Y0.132209 | |||
G01 Z-0.125000 F100.0(Penetrate) | |||
G03 X1.990544 Y2.288690 Z-0.125000 I-1.107281 J2.952747 F400.000000 | |||
G02 X9.092465 Y19.860171 Z-0.125000 I71.366306 J-18.623402 | |||
. . . | |||
G02 X0.046473 Y0.132209 Z-0.125000 I-41.512153 J291.572431 | |||
G01 X0.046473 Y0.132209 Z-0.125000 | |||
G00 Z5.000000 | |||
(End cutting path id: path1) | |||
(Footer) | |||
M5 | |||
G00 X0.0000 Y0.0000 | |||
M2 | |||
</syntaxhighlight> | |||
=== Generated by === | |||
=== Generated by === | |||
=== Generated by === | |||
=== Generated by === | |||
=== Cuts === | |||
Leka | |||
* https://wiki.luntti.net/index.php?title=File:Leka.svg | |||
* https://wiki.luntti.net/index.php?title=File:LekaAllHershey.svg | |||
== Speed rates == | |||
Some terms | |||
* Spindle speed RPM | |||
* Feed rate | |||
** Too slow of a feed rate reduces the tool life. | |||
** Too fast a feed rate can cause the tool to break. | |||
** Too fast a feed rate can cause chatter (the unsmooth surface with periodical unevenness). | |||
** Too fast a feed rate results in a poor surface finish. | |||
* Cutting feed (the distance the tool is advanced in one revolution). Feed Rate = Cutting Feed x RPM | |||
* Chip load / Feed per tooth (the distance that each edge of the cutter moves in one revolution). How much material each of your cutter teeth can potentially remove every time they turn. | |||
* | |||
== References == | == References == | ||
Latest revision as of 12:04, 12 July 2025
Introduction
-
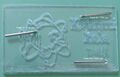
Engraving on plastic
-
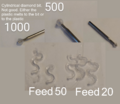
Plastic with cylindrical diamond bit. Feed 50 (Spindle speed 1000 too much: melts, 250 about minimum; still melts, 100 too low; does not cut). Feed 20 (Spindle 250: melts back to the engraving; melts a little to the bit). Feed 30: same problem. Need to get a better bit with flutes to drive the plastic away.
-
Plywood
-

The cylidrical bit weared out and dug itself into the plywood


Aim to do graving and milling PCB boards.
Maximum size of the material: 300 x 180 x 50 mm3.
Workflow
- Design the cut
- Use Inkscape's GCodeTool to generate the path
- Use Candle (1.2.13b works) to
- Simulate
- Test run above the material
- Do the milling
Speed and materials
- Plastic: Slow speed. 400 / 3400 too much: Burns.
Acrylic (plexigalas, Lucitem PMMA). Other plastics incluce ABS, Delrin, HDPE. . .
- Do not cut deep (melts). Set the to about .004 depth (which units).
- Use ACR or FLX bits (they are the same).
- Use a low spindle speed for best results. (Burnishing uses a very high spindle speed.)
| Material (bit) | Feed speed | Spindle rpm | Depth |
|---|---|---|---|
| Plastic/ Acrylic | Low (plastic melts) | ||
| Wood | Example | High (less burning) | |
| Metal | Example | High | |
| Al/ Cu/ | Example | Often high. Lubricant |
Cutters
The supplied engraving cutters are a really bad choice.
Vinyl
Drag Knife
- Blade holder for
- Graphtec Vinyl Cutter Plotter CB09 Klingenhalter 15 Stk. 45° Klingen
- Blade Holder Summa Vinyl Cutter Blades For Summa Blades Vinyl Cutter
- 5x30°+5x45°+5x60° CB09 Klingenhalter Plottermesser Für Graphtec Schneideplotter
Heat Transfer Vinyl (Wärmeübertragung Vinyl HTV)
Application Instructions (HOME IRON):
- Set iron dial between Wool and Cotton
- Cover design with cover sheet (Teflon Sheet)
- Place on a flat, hard surface (ironing board not recommended)
- Press iron with medium/firm pressure (do not slide iron)
- Press each section of the design for 10-15 seconds, apply design at 305 °F
- If area of design lift after application, apply cover sheet and repress for 10-15 seconds
- Peel carrier cold
- Cover completed design and press for 5-10 seconds
Software
Software for controlling the machine (3axis)
- CH340SER
- Grblcontrol(Candle_1.1.7 ) is used to send the command to the CNC mill using premade G Code.
- Baud rate: 11500
G Code
- https://jscut.org/jscut.html#
- Works only with closed paths; thus use Stroke to path to generate closed loop.
- Inkscape Gcodetools
- The default origin is the lower left corner of the image. Set the origin (orientation points) into a suitable place
- Check the origin at the Candle!
- Hershey fonts can be generated easily using Extensions -> Text -> Hershey
- Inkscape GCodePlot
- CadToCNC
- Online
- GCode creator https://sameer.github.io/svg2gcode/ and github at https://github.com/sameer/svg2gcode
- Gcode viewer https://ncviewer.com/
- Python
- svg-to-gcode 1.5.4
- Carbide Create
Svg to STL and to GCode
GCode short tutorial

Some commands
G21Metric systemG90Absolute mode. All movements are relative to a fixed zero or machine home location.G1Linear interpolation. Move in a straight line to a specific location. The speed is the feed rate (F).G3Circle: The target coordinates at the end of the movement. I, J – The arc’s center point coordinates relative to the starting coordinates.
M2End of code.M3Spindle on clockwise.M4Spindle on counterclockwise.
Generated by JsCUT
Problem; No open paths. Could be fixed by manipulating the gcode afterwards.
G21         ; Set units to mm
G90         ; Absolute positioning
G1 Z2.54 F2540      ; Move to clearance level

; Operation:    0
; Name:
; Type:         Inside

; Path 0
; Rapid to initial position
G1 X40.8960 Y-24.8468 F2540
G1 Z0.0000
; plunge
G1 Z-3.1750 F127
; cut
G1 X40.8051 Y-24.9034 F1016
G1 X40.6768 Y-24.9809
. . .
G1 X40.8960 Y-24.8468
; Retract
G1 Z2.5400 F2540

;
; Operation:    1
; Cut Depth:    3.175
; Rapid to initial position
G1 X16.9248 Y-11.6624 F2540
G1 Z0.0000
; plunge
G1 Z-3.1750 F127
; cut
G1 X16.9581 Y-11.6253 F1016
. . .
G1 X16.9248 Y-11.6624
; Retract
G1 Z2.5400 F2540
M2
Generated by svg2gcode
No z movement. No end mark. However, "users can now specify a G-Code sequence to run at the beginning/end of a program and when the tool is turned on/off."
G21
G90;svg#svg1 > g#layer1 > path#path1
G0 X0.04645099999999763 Y0.13227800000000317
G1 X0.11730768492817545 Y0.1655076085116844 F300
. . .
G1 X0.0464510000000161 Y0.13227800000000342 F300;svg#svg1 > g#layer1 > path#path2
G0 X15.828818999999998 Y16.684519000000005
G1 X15.958402417724608 Y16.436593348144537 F300
. . .
G1 X15.828818999999998 Y16.684519000000005 F300
Generated by Inkscape
The first test is short and simple. Does all the things I want.
M3
(Header end.)
G21 (All units in mm)

(Start cutting path id: path2)
(Change tool to Default tool)

G00 Z5.000000
G00 X15.828841 Y16.684450

G01 Z-0.125000 F100.0(Penetrate)
G03 X18.692664 Y11.495468 Z-0.125000 I96.722379 J49.996752 F400.000000
G03 X21.465422 Y7.194707 Z-0.125000 I53.645546 J31.541811
. . .
G03 X15.828841 Y16.684450 Z-0.125000 I1.837010 J-3.751889
G01 X15.828841 Y16.684450 Z-0.125000
G00 Z5.000000

(End cutting path id: path2)


(Start cutting path id: path1)
(Change tool to Default tool)

G00 Z5.000000
G00 X0.046473 Y0.132209

G01 Z-0.125000 F100.0(Penetrate)
G03 X1.990544 Y2.288690 Z-0.125000 I-1.107281 J2.952747 F400.000000
G02 X9.092465 Y19.860171 Z-0.125000 I71.366306 J-18.623402
. . .
G02 X0.046473 Y0.132209 Z-0.125000 I-41.512153 J291.572431
G01 X0.046473 Y0.132209 Z-0.125000
G00 Z5.000000

(End cutting path id: path1)

(Footer)
M5
G00 X0.0000 Y0.0000
M2
Generated by
Generated by
Generated by
Generated by
Cuts
Leka
- https://wiki.luntti.net/index.php?title=File:Leka.svg
- https://wiki.luntti.net/index.php?title=File:LekaAllHershey.svg
Speed rates
Some terms
- Spindle speed RPM
- Feed rate
- Too slow of a feed rate reduces the tool life.
- Too fast a feed rate can cause the tool to break.
- Too fast a feed rate can cause chatter (the unsmooth surface with periodical unevenness).
- Too fast a feed rate results in a poor surface finish.
- Cutting feed (the distance the tool is advanced in one revolution). Feed Rate = Cutting Feed x RPM
- Chip load / Feed per tooth (the distance that each edge of the cutter moves in one revolution). How much material each of your cutter teeth can potentially remove every time they turn.